프로젝트를 진행하면서 만들게 되었던 Calendar 만들기 정리
기본적으로 html [input] 태그를 이용해서 캘린더를 만들 수 있는데요
확인부터 해보겠습니다.
<input type="date" />
기본적인 달력도 디자인이 이상하진 않지만 저희가 원하는 달력의 모양이 아니므로, 달력을 새로 만들어봅시다.
저는 달력을 IBM Carbon Design System 바탕으로 약간 조정해서 저의 달력을 디자인을 먼저 잡고 시작했습니다
기본적인 구성
1. 달력의 width 값은 450px
2. 모서리는 10px
3. 화면 배경 색 : #008AFF / 달력 배경색 : #FFF
1. Html 뼈대 잡기
<div class="wrapper"> <header> <div class="nav"> <button class="material-icons"> chevron_left </button> <p class="current-date">September 2022</p> <button class="material-icons"> chevron_right </span> </div> </header> <div class="calendar"> <ul class="weeks"> <li>Sun</li> <li>Mon</li> <li>Tue</li> <li>Wed</li> <li>Thu</li> <li>Fri</li> <li>Sat</li> </ul> <ul class="days"> <li class="inactive">27</li> <li class="inactive">28</li> <li class="inactive">29</li> <li class="inactive">30</li> <li>1</li> <li>2</li> <li>3</li> <li>4</li> <li>5</li> <li>6</li> <li>7</li> <li>8</li> <li>9</li> <li>10</li> <li>11</li> <li>12</li> <li>13</li> <li>14</li> <li>15</li> <li>16</li> <li>17</li> <li>18</li> <li>19</li> <li>20</li> <li>21</li> <li>22</li> <li>23</li> <li>24</li> <li>25</li> <li>26</li> <li>27</li> <li>28</li> <li>29</li> <li>30</li> <li>31</li> </ul> </div> </div>
우선 JS로 날짜를 가지고 오기전에 12월 달력을 직접 입력한 후 CSS를 입힌 후에 JS를 이용해서 날짜를 가져오는 순서대로 글을 작성해보겠습니다.
HTML은 이렇게 작성한 후 CSS로 원하는 디자인의 모양을 잡아주겠습니다.
2. 스타일 입히기
/*#1 */ @import url('https://fonts.googleapis.com/css2?family=Poppins:wght@400;500;600&display=swap'); /*#2 */ * { margin: 0; padding: 0; box-sizing: border-box; font-family: 'Poppins', sans-serif; } /*#3 */ button { /* button 요소에 기본적으로 설정되는 스타일 속성 초기화 */ border: none; outline: none; background-color: transparent; padding: 0; cursor: pointer; } /*#4 */ body { display: flex; align-items: center; justify-content: center; min-height: 100vh; background: #008aff; }
▼ 소스코드 살펴보기
#1 : Poppins 구글 폰트를 가지고 와서 사용해보도록 하겠습니다.
#2. 전체 태그들의 초기화 및 초기 세팅
#3. button 또한 기본적으로 적용되어있는 스타일 속성을 초기화시켜줍니다.
#4. 달력을 화면 가운데에 정렬하기 위한 css
/*#5 */ .wrapper { width: 450px; background: #fff; border-radius: 10px; padding: 25px; } /*#6*/ .wrapper .nav { display: flex; align-items: center; justify-content: space-between; margin-bottom: 30px; } .wrapper .nav .current-date { font-size: 24px; font-weight: 600; } .wrapper .nav button { width: 38px; height: 38px; font-size: 30px; color: #878787; }
▼ 소스코드 살펴보기
#5. 달력의 크기와 라운드, 배경 지정
#6. 년도와 월 표시 및 이동 화살표 배치
/*#7*/ .calendar ul { display: flex; list-style: none; flex-wrap: wrap; text-align: center; } .calendar .weeks li { font-weight: 500; } .calendar .days { margin-bottom: 20px; } .calendar ul li { /*#8*/ width: calc(100% / 7); /*#9*/ position: relative; } .calendar .days li { /*#10*/ z-index: 1; margin-top: 30px; cursor: pointer; } /*#11*/ .days li.inactive { color: #aaa; }
▼ 소스코드 살펴보기
#7. 요일과 날짜들을 가로로 배치
#8. 요일과 날짜의 width 값
- calc() 함수를 이용하여서 100% / 7을 계산하여 width 잡기
#9. 오늘의 날짜 표시 위치를 잡기 위한 Position
#10. li요소들을 z-index로 살짝 띄워주기
- 오늘의 날짜 표시를 위해
#11. 이전 달의 날짜의 색상 다르게 적용
.days li.active { color: #fff; } .calendar .days li::before { position: absolute; content: ''; height: 40px; width: 40px; top: 50%; left: 50%; transform: translate(-50%, -50%); border-radius: 50%; z-index: -1; } .days li:hover::before { background: #f2f2f2; } .days li.active::before { background: #008aff; }
▼ 소스코드 살펴보기
#12. 오늘의 날짜를 표시하기 위한 가상 요소
#13. .active를 기준으로 위치 배치
#14. 날짜를 hover 했을 때의 배경색 변경
#15. 오늘의 날짜 배경색은 포인트 컬러 색으로 변경
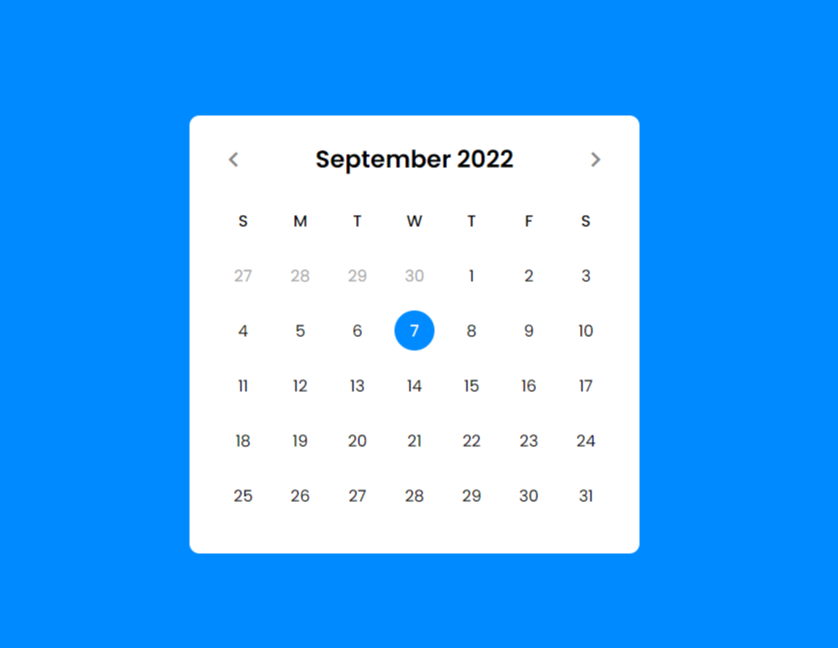
디자인부터 HTML, CSS까지 작업이 완료된 상태만 봐도 뿌듯하시죠?
지금은 HTML에 그냥 날짜와 연도, 월을 입력한 상태지만
다음 포스트에서는 현재 날짜와 연도, 월을 가지고 와서 동적인 달력을 만들어 봅시다.
JS 구현
1. 날짜 가지고 오기
2. 월 이동 버튼 구현
3. 이번 달이 아닌 날짜들은 색상 다르게 구현
4. 오늘 날짜 표시하기
남은 자바스크립트까지 구현에 성공해서 나만의 달력을 만들어 봅시다.
그럼 다음 포스트에서 만나요!!
궁금하신 점이나 이해하기 어려운 부분은
댓글로 달아주시면 제가 친절하고 아는 선에서 알려드릴게요^^
댓글과 하트는 저에게 많은 힘이 됩니다 :)
'Web > JavaScript' 카테고리의 다른 글
| Dynamic Calendar 만들기 - 날짜 가져오기 (JS) (0) | 2022.12.08 |
|---|---|
| 향상된 이미지 갤러리 기능 구현 (0) | 2021.08.11 |
| 기본적인 이미지 갤러리 기능 구현 (2) | 2021.08.09 |
| 향상된 뉴스티커(News ticker) 기능 구현 (0) | 2021.08.06 |
| 기본적인 뉴스티커(News ticker) 기능 구현 (0) | 2021.08.05 |


댓글